I Coded the Angular Tutorial App in Backbone and it Took 260% More Code
tl;dr
The people at AngularJS created their PhoneCat tutorial app with 48 lines of JavaScript . When we coded the same app using Backbone instead of Angular, we found it took 171 lines of JavaScript – 260% more code. Here, we present a step-by-step tutorial of how we replicated the Angular tutorial in Backbone.
A while ago I decided to check out Angular since everyone’s been talking about it. I went to the Angular website and worked through their fantastic tutorial. I could see the merits of their approach, but I was left with the nagging feeling that if I coded the same application in Backbone it would only take me a few extra lines of code – a binding here and a callback there and I’d be done, right?
It turns out that I was wrong. After actually reproducing the Angular tutorial in Backbone, I found that it took significantly more JavaScript as well as a good bit of finesse. I thought I would share my Backbone version of the Angular tutorial as a step-by-step guide so that it is easy to make a direct comparison between Angular and Backbone.
To get started, clone the backbone-phonecat repository on GitHub into your current directory.
git clone https://github.com/204NoContent/backbone-phonecat.git
```
We're using Node as our back-end so make sure it is installed.
```
node --version
```
If Node isn't there, [download](http://nodejs.org/download/) and install it.
In order to start up the web server that powers this tutorial, `cd` into the backbone-phonecat directory and run
```
node app.js
```
Node should output `Express server listening on port 8888`, at which point we can navigate over to [localhost:8888](http://localhost:8888/), to see a list of phones displayed on the screen.
[](https://svbtleusercontent.com/bsdvplkz7f9p4w.png)
What's on the screen presently is the finished product of what we will be building in this tutorial. The tutorial is structured so that we can directly jump to any step along the way by checking out a previous commit using git. In all, there are 11 steps, step-0 through step-10. We'll begin by resetting our code to step-0, but since we don't necessarily want to take down our web server by killing the running Node process, it is best to leave the Node process running in the current terminal and open up a new terminal window or tab. Once again `cd` into the `bacbone-phonecat` directory.
# Step-0 Bootstrapping the Backbone App
To reset our work-space to the first step run
```
git checkout -f step-0
```
Refresh the page at [localhost:8888](http://localhost:8888/) and text `Nothing here yet!` should be the only thing on the screen. Node is currently generating this output by serving up the following file
**views/index.ejs**
```html
<!DOCTYPE html>
<html lang='en'>
<head>
<meta charset='utf-8'>
<title><%= title %></title>
<link rel="stylesheet" href="/stylesheets/app.css">
<link rel="stylesheet" href="/stylesheets/bootstrap.css">
<!-- These scripts would be a single cacheable file in production -->
<script src="/javascripts/lib/jquery.js"></script>
<script src="/javascripts/lib/underscore.js"></script>
<script src="/javascripts/lib/backbone.js"></script>
<script src="/javascripts/jst.js"></script>
<script src="/javascripts/router.js"></script>
<script src="/javascripts/init.js"></script>
</head>
<body>
<section id='main'>
Nothing here yet!
</section>
</body>
</html>
```
The text `Nothing here yet!` appears on the screen because it is the content of our main section. This static text is included on the server side for this step only. All future steps will use Backbone to dynamically generate all page content.
Since we're just tying to bootstrap the app, Backbone does not have a large role so far. All we're doing is loading Backbone's requirements, then Backbone itself. After that we load `jst.js`, which is an Underscore.js templating dictionary that our Node server will automatically generate for us (which means you should ignore the specifics of the code in that file). The last two scripts are the only real parts of our Backbone app so far.
**public/javascripts/router.js**
```javascript
Router = Backbone.Router.extend({
routes: {
}
});
```
`router.js` is a place for us to define Backbone routes in the future. Currently, no URLs will match since the `routes` object is empty.
**public/javascripts/init.js**
```javascript
App = new Router();
$(document).ready(function () {
Backbone.history.start({ pushState: true });
});
```
`init.js` creates new instance of the Backbone router and then tells Backbone to start monitoring browser history changes (page navigation).
# Step-1 Static Phone List
Reset the work-space to the next step by running
```
git checkout -f step-1
```
We'll discuss the more important changes below, and you can see the full diff on [github](https://github.com/204NoContent/backbone-phonecat/commit/24ec7c36574daa78e64d766b0a1ec272fcb6275e), or by running `git diff step-0 step-1`
The objective of this section is to use Backbone to fill in the contents of the main section by generating some static HTML . To do this we're going to need to create a route that will match the root path of our application `http://localhost:8888`.
**public/javascripts/router.js**
```javascript
Router = Backbone.Router.extend({
routes: {
'': 'phonesIndex',
},
phonesIndex: function () {
new PhonesIndexView({ el: 'section#main' });
}
});
```
Here we match our application's root path `''` to the `phonesIndex` method of the router that we also defined. The `phonesIndex` method instantiates a new Backbone view and tells it to place its content inside of `<section id='main'>`, which by the way, is no longer populated with any placeholder text from the server.
Next, we need a
need to create a Backbone view.
**public/javascripts/views/phones/index_view.js**
```javascript
PhonesIndexView = Backbone.View.extend({
initialize: function () {
this.render();
},
render: function () {
this.$el.html(JST['phones/index']());
}
});
```
All this view does is render the content of a JavaScript template file `public/javascripts/templates/phones/index.jst`, which we indicate by passing `phones/index` as the look up key to our JST dictionary.
**public/javascripts/templates/phones/index.jst**
```html
<ul>
<li>
<span>Nexus S</span>
<p>
Fast just got faster with Nexus S.
</p>
</li>
<li>
<span>Motorola XOOM™ with Wi-Fi</span>
<p>
The Next, Next Generation tablet.
</p>
</li>
</ul>
```
That's pretty much it for this section, the only other change was to make sure we told our browser about the newly created JavaScript files. So in `views/index.ejs` , we added `<script src="/javascripts/views/phones/index_view.js"></script>`, but that isn't very interesting and we won't be mentioning script loading changes again.
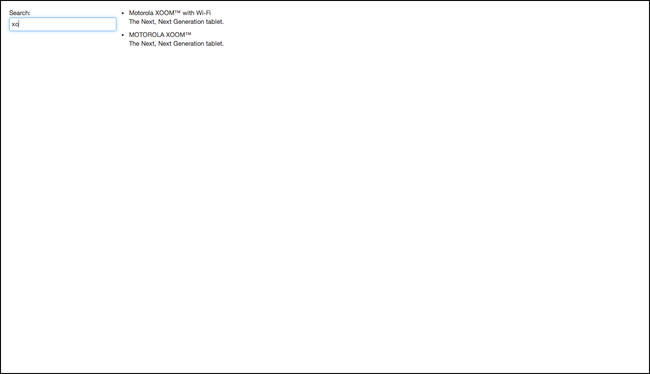
Navigating over to [localhost:8888](http://localhost:8888) now shows the result of the Backbone generated static HTML.
[](https://svbtleusercontent.com/l290drcddpbmhw.png)
# Step-2 Backbone Models and Collections
Reset the work-space to the next step by running
```
git checkout -f step-2
```
The full diff can be found on [github](https://github.com/204NoContent/backbone-phonecat/commit/6d6b8e26617b9aaf14e8fc136b64f08743b6caa6).
The aim of this section is to use Backbone to dynamically create a list of phones from some source data. To do this we'll make a Backbone collection of Backbone models, and then pass each of those models to a template to be rendered out as HTML. First let's create the phone model.
**public/javascripts/models/phone.js**
```javascript
Phone = Backbone.Model;
```
Super simple, but now we can create new instances of `Phone` and we'll have access to all the goodness that Backbone provides for models, like being members of Backbone collections and seamless integration into the event bus.
Next up, the Backbone collection to house `Phone` models
**public/javascripts/collections/phones_collection.js**
```javascript
PhonesCollection = Backbone.Collection.extend({
model: Phone
});
```
We tell Backbone that our `PhonesCollection` will be made up of phone models by setting the value of `model` to `Phone`. When a new collection is created, Backbone will automatically convert any initialization data to their equivalent representation as `Phone` models.
We'll create a new phones collection with some hard coded data in our `phones/index_view.js`.
**public/javascripts/views/phones/index_view.js**
```javascript
PhonesIndexView = Backbone.View.extend({
initialize: function () {
this.collection = new PhonesCollection([
{'name': 'Nexus S',
'snippet': 'Fast just got faster with Nexus S.'},
{'name': 'Motorola XOOM™ with Wi-Fi',
'snippet': 'The Next, Next Generation tablet.'},
{'name': 'MOTOROLA XOOM™',
'snippet': 'The Next, Next Generation tablet.'}
]);
this.render();
new PhonesIndexListView({
el: this.$('ul.phones'),
collection: this.collection
});
},
render: function () {
this.$el.html(JST['phones/index']());
}
});
```
`this.collection` is a Backbone collection of Backbone `Phone` models, and all we had to do is input the data. We've also created an instance of a Backbone view called `PhonesIndexListView`, which we've yet to create. We've altered the template of `phones/index` to only contain a single line `<ul class='phones'></ul>` so that we have a place for `PhonesIndexListView` to render its content.
The job of `PhonesIndexListView` will be to iterate over every phone in the phones collection and render out the corresponding phone template. Let's create it now.
**public/javascripts/views/phones/index_list_view.js**
```javascript
PhonesIndexListView = Backbone.View.extend({
initialize: function () {
this.render();
},
render: function () {
this.$el.html('');
this.collection.each(this.renderPhone, this);
},
renderPhone: function (phone) {
this.$el.append(new PhonesIndexListPhoneView({
tagName: 'li',
model: phone
}).el);
}
});
```
Currently, on initialization, the view calls its own render method that wipes the HTML of its assigned `<ul>`. Then it passes each model in the phones collection to `renderPhone`. The job of `renderPhone` is to pass each phone model to a new view that will process the model into HTML. That processed HTML will then be accessible through `PhonesIndexListPhoneView`'s `el` method. That rendered HTML for each model view will then be appended to the phones lists `<ul>`. The end result is the HTML of all the phones will show up on a list.
`PhonesIndexListPhoneView` is quite simple since all it does is convert a phone model to its HTML equivalent.
**public/javascripts/views/phones/index_list_phone_view.js**
```javascript
PhonesIndexListPhoneView = Backbone.View.extend({
initialize: function () {
this.render();
},
render: function () {
this.$el.html(JST['phones/index_list_phone'](this.model));
}
});
```
The only interesting bit is that we are passing the phone model to our JavaScript template by referencing it as the argument to the JST template method. The properties (methods) of the phone model are automatically placed in the local scope of the template.
**public/javascripts/templates/phones/index_list_phone.jst**
```html
[[= get('name') ]]
<p>[[= get('snippet') ]]</p>
```
Here we are using the notation `[[` for embedded JavaScript, where the inclusion of the equals sign `[[=` indicates that the the evaluated expression will be interpolated to a string. The Backbone model method `get` is a convenience method for getting the value of one of the phone's attributes, and is the complement of the Backbone's `set` method (which should almost always be used to set all model attributes so that all model changes will be picked up by event bus).
Details aside, the name and snippet of each phone will now be dynamically written to the screen. We can see this in action by navigating over to [localhost:8888](http://localhost:8888).
[](https://svbtleusercontent.com/swmatq6ijjxpbq.png)
# Step-3 Interactive Search
Reset the work-space to the next step by running
```
git checkout -f step-3
```
The full diff can be found on [github](https://github.com/204NoContent/backbone-phonecat/commit/47f26c7334f28f0182f20bd5ea65c1cd99b3d6d6).
We want to add a search field to the page so that we can display only those phones that match the search criteria. To make this happen, we'll give our phones collection the ability to filter itself in a similar fashion to Angular's query filter. We can create this new method by customizing the out-of-the-box filter collection method that Backbone (Underscore) provides.
**public/javascripts/collections/phones_collection.js**
```javascript
PhonesCollection = Backbone.Collection.extend({
model: Phone,
query: function (query) {
if (!query || query === '') return this.models;
return this.filter(function (phone) {
return phone.values().join().match(new RegExp(query, 'i'));
});
}
});
```
Now when we call call `query`, on our `PhonesCollection` we will get back an array of `Phone` models that match our search term.
Before we go any farther, let's take a moment to think about the specifics of what we want to happen. We would like there to be an input field on the screen where the user can enter a search term. The list of phones should be updated with each keystroke to reflect the current state of the input field. This means that we are going to need the phones collection to update and render itself every time a user types a character in the input field. There are many techniques that can be used to accomplish this behavior, but the technique we are going to use here is to create a Backbone model called `Filter` to collect user input.
**public/javascripts/models/filter.js**
```javascript
Filter = Backbone.Model;
```
The advantage of using a Backbone model is that Backbone models emit change events whenever any of their attributes change. This sort of behavior is exactly what we need. If we can link the state of our search input field to the state of `Filter`, then whenever the input field is changed, our `Filter` model will emit those change events. We'll listen to `Filter` change events and update our collection accordingly. First lets alter the index view to create a new instance of our `Filter` and its corresponding view
NOTE: vertical ellipses mean that code has been omitted for brevity.
```javascript
PhonesIndexView = Backbone.View.extend({
initialize: function () {
this.filter = new Filter();
.
.
.
new PhonesFilterView({
el: this.$('.filter'),
model: this.filter,
collection: this.collection
});
new PhonesIndexListView({
el: this.$('ul.phones'),
model: this.filter,
collection: this.collection
});
},
.
.
.
```
We created a filter instance and passed it down to both a new `PhonesFilterView` and `PhonesIndexListView`. Creating the filter model in this view and passing it to both child views means that each view will have access to filter model events.
First, let's examine the `PhonesFilterView`
**public/javascripts/views/phones/filter_view.js**
```javascript
PhonesFilterView = Backbone.View.extend({
events: {
'keydown input.query': 'setQuery',
},
initialize: function () {
this.render();
},
render: function () {
this.$el.html(JST['phones/filter']());
},
setQuery: function (event) {
// make it snappy using keydown and pushing it to next tick
window.setTimeout($.proxy(function() {
this.model.set('query', event.target.value.replace(/^\s+|\s+$/g, ''));
}, this), 0);
}
});
```
This view renders out an input tag in its template, but more importantly it uses Backbone's event hash to set up a mapping between input `keydown` events and its own `setQuery` method. `setQuery` looks a little funky but all it does is set the query attribute of our filter model to the current value of the input field. When an attribute of the filter model is set, Backbone will check if the value has changed and if so, it will trigger a `'change:attr'` event on the model, where `attr` is the name of the attribute that was changed. So in our case, whenever the query value of the filter changes, Backbone will trigger `'change:query'` on the filter model.
We can utilize this behavior to update our phone collection by listening for those change events.
**public/javascripts/views/phones/index_list_view.js**
```javascript
PhonesIndexListView = Backbone.View.extend({
initialize: function () {
this.filtered_collection = new PhonesCollection();
this.listenTo(this.filtered_collection, 'add', this.renderPhone);
this.render();
this.listenTo(this.model, 'change:query', this.render);
},
render: function () {
var filtered_phones = this.collection.query(this.model.get('query'));
this.filtered_collection.set(filtered_phones);
},
renderPhone: function (phone) {
var position = this.filtered_collection.indexOf(phone);
this.phoneView = new PhonesIndexListPhoneView({
tagName: 'li',
model: phone
});
if (position === 0) {
this.$el.prepend(this.phoneView.el);
} else {
$(this.$('li')[position - 1]).after(this.phoneView.el);
}
}
});
```
There is bit going on here, so we'll take it one step at a time. Toward the end of the initialization method, we set up a listener for `filter` changes. When a change is detected, the render method is called which filters the collection based on the query. The filtered collection is then `set` with the models that made it through the query filter. A collection `set` in Backbone does a smart update of the collection, adding and removing models as necessary. In addition, Backbone triggers an `add` or a `remove` event for every model that was added or removed from the collection. In the first part of our initialization, we set up a listener to render any models that are added to the filtered collection. The result is that each model added to the collection appears on the screen (the fancy bit in the render method just ensures that each model appears in the correct order). The only thing left to do is to remove a phone from the screen when it is removed from a collection. This is accomplished in the phone model view.
**public/javascripts/views/phones/index_list_phone_view.js**
```javascript
PhonesIndexListPhoneView = Backbone.View.extend({
initialize: function () {
this.listenTo(this.model, 'remove', this.remove);
this.render();
},
.
.
.
```
Here we listen to the phone remove event and use Backbone's built in `View` remove method to detach listeners and remove the element from the screen.
Navigating over to [localhost:8888](http://localhost:8888) now displays a list of phones that can be filtered with the search field.
[](https://svbtleusercontent.com/tjq4uu8yerdhq.png)
# Step-4 Phone Ordering
Reset the work-space to the next step by running
```
git checkout -f step-4
```
The full diff can be found on [github](https://github.com/204NoContent/backbone-phonecat/commit/7446c0f559f0815f3dabc54bb01549d62276bb95).
The idea behind ordering is very similar to text search. We're going to have an order drop down of possible ordering values. When one is selected, a corresponding `Filter` `sort` attribute will be updated to reflect the current state. The `Filter` will naturally emit a change event, which in this case will be `'change:sort'`. We can listen for this event in the phones index list view and re-render the collection. We also want to default the sorting to display the newest phone first. To do that, we default the `Filter` model, since Backbone supports a default hash out-of-the-box.
**public/javascripts/models/filter.js**
```javascript
Filter = Backbone.Model.extend({
defaults: {
sortBy: 'age'
}
});
```
Next we alter the filter view to listen for drop down change events and respond accordingly
**public/javascripts/views/phones/filter_view.js**
```javascript
PhonesFilterView = Backbone.View.extend({
events: {
'keydown input.query': 'setQuery',
'change select.sort': 'setSort'
},
.
.
.
render: function () {
// these next few lines massage data to make
// the template more straightforward
this.order_options = [{ value: 'name', text: 'Alphabetical'}, { value: 'age', text: 'Newest' }];
var selected_option = _.findWhere(this.order_options, { value: this.model.get('sortBy') }, this);
if (selected_option) selected_option.selected = true;
this.$el.html(JST['phones/filter']({ order_options: this.order_options }));
},
.
.
.
setSort: function (event) {
this.model.set('sortBy', event.target.value);
}
});
```
The template reference here is somewhat interesting because we iterate over an array of drop down values and default the selection to the drop down value where the `selected` attribute is set to `true`.
**public/javascripts/templates/phones/filter.jst**
```html
Search:
<input class='query'>
Sort by:
<select class='sort'>
[[ _.each(order_options, function (option) { ]]
<option value="[[= option.value ]]" [[= option.selected ? 'selected': '']]>[[= option.text ]]</option>
[[ }) ]]
</select>
```
The last step is to have the phones index list view respond to filter changes.
**public/javascripts/views/phones/index_list_view.js**
```javascript
PhonesIndexListView = Backbone.View.extend({
initialize: function () {
.
.
.
this.listenTo(this.model, 'change:sortBy', this.rerender);
this.listenTo(this.model, 'change:query', this.render);
},
render: function () {
var filtered_phones = this.collection.query(this.model.get('query'));
filtered_phones = _.sortBy(filtered_phones, function (phone) {
var attr_value = phone.get(this.model.get('sortBy'));
return _.isString(attr_value) ? attr_value.toLowerCase() : attr_value;
}, this);
this.filtered_collection.set(filtered_phones);
},
.
.
.
rerender: function () {
this.filtered_collection.set();
this.render();
}
});
```
And to actually get the phones to order by age, we have to update our data with an age attribute.
**public/javascripts/views/phones/index_view.js**
```javascript
PhonesIndexView = Backbone.View.extend({
initialize: function () {
this.filter = new Filter();
this.collection = new PhonesCollection([
{'name': 'Nexus S',
'snippet': 'Fast just got faster with Nexus S.',
'age': 1},
{'name': 'Motorola XOOM™ with Wi-Fi',
'snippet': 'The Next, Next Generation tablet.',
'age': 2},
{'name': 'MOTOROLA XOOM™',
'snippet': 'The Next, Next Generation tablet.',
'age': 3}
]);
.
.
.
```
We can now sort to our heart's content at [localhost:8888](http://localhost:8888)
[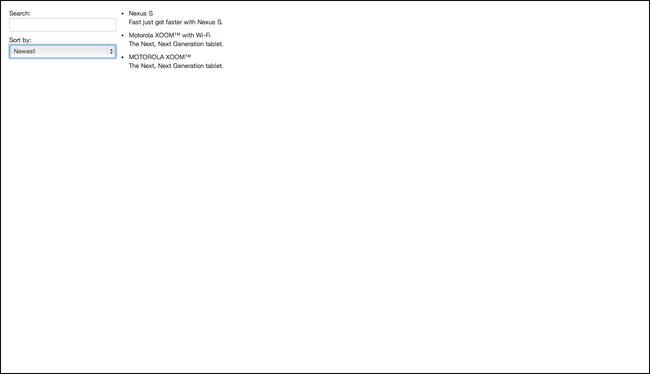](https://svbtleusercontent.com/gx86iqbcowkw.png)
# Step-5 API integration
Reset the work-space to the next step by running
```
git checkout -f step-5
```
The full diff can be found on [github](https://github.com/204NoContent/backbone-phonecat/commit/89bad0b234c87f521154034b55376906d95b7690).
API integration is one area where Backbone really shines. The aim of this section is to issue a request to our web server to fetch our phone model data instead of having it hard coded in the view. Retrieving data in this fashion is commonplace in most production apps. Making this process work is super easy in Backbone. First we need to tell our `PhonesCollection` where it can expect to find phones list data.
**public/javascripts/collections/phones_collection.js**
```javascript
PhonesCollection = Backbone.Collection.extend({
model: Phone,
url: '/api/phones',
.
.
.
});
```
Next, after we instantiate a new phone collection in the view, we need to tell it to fetch its data from the server.
**public/javascripts/views/phones/index_view.js**
```javascript
PhonesIndexView = Backbone.View.extend({
initialize: function () {
this.filter = new Filter();
this.collection = new PhonesCollection();
.
.
.
this.collection.fetch();
}
.
.
.
```
Finally, since our phones list data isn't being pre-populated like before, we have to wait until the server responds with the data before we can render it out.
**public/javascripts/views/phones/index_list_view.js**
```javascript
PhonesIndexListView = Backbone.View.extend({
initialize: function () {
this.filtered_collection = new PhonesCollection();
this.listenTo(this.filtered_collection, 'add', this.renderPhone);
// render when data is returned from server
this.listenTo(this.collection, 'sync', this.render);
this.listenTo(this.model, 'change:sortBy', this.rerender);
this.listenTo(this.model, 'change:query', this.render);
}
.
.
.
```
And that's it. Our phones are now being fetched from our API back-end and displayed at [localhost:8888](http://localhost:8888)
# Step-6 Phone Images and links
Reset the work-space to the next step by running
```
git checkout -f step-6
```
The full diff can be found on [github](https://github.com/204NoContent/backbone-phonecat/commit/16a6b1edd653712fa8631517da73edb1f754a838).
Images and links in Backbone are nothing special, we just need to generate the appropriate HTML using the data already in each phone model.
**public/javascripts/templates/phones/index_list_phone.jst**
```javascript
<a href="/phones/[[= get('id') ]]" class='thumb'><img src="[[= '/' + get('imageUrl') ]]"></a>
<a href="/phones/[[= get('id') ]]">[[= get('name') ]]</a>
<p>[[= get('snippet') ]]</p>
```
Here, we are creating the URL of an individual phone by appending its `id` to the phones path. The approach we usually take is to have our API return an absolute path to the phone show page for us, so all we have to do is display that URL. But, in this case, we are using the data provided by Angular. Same thing goes for the image source.
However, we have one small problem with our links. We have not told Backbone to intercept link click events, so the browser is going to do what it normally does and navigate by doing a full page refresh. Since our app is so simple, we're just going to intercept and handle the click event where it happens -- in our index view.
**public/javascripts/views/phones/index_list_phone_view.js**
```javascript
PhonesIndexListPhoneView = Backbone.View.extend({
events: {
'click a': 'navigate'
},
.
.
.
navigate: function (event) {
event.preventDefault();
App.navigate(event.currentTarget.pathname, { trigger: true });
}
});
```
After we prevent the event from propagating to the browser, we tell the instance of our Backbone router, `App`, to use `pushState` to update the browser history and also trigger any appropriate route event that matches the new URL. We have yet to implement any other routes so right now clicking a link will get us nowhere.
On the upside, since we added images and links, our index page at [localhost:8888](http://localhost:8888) now looks nice.
[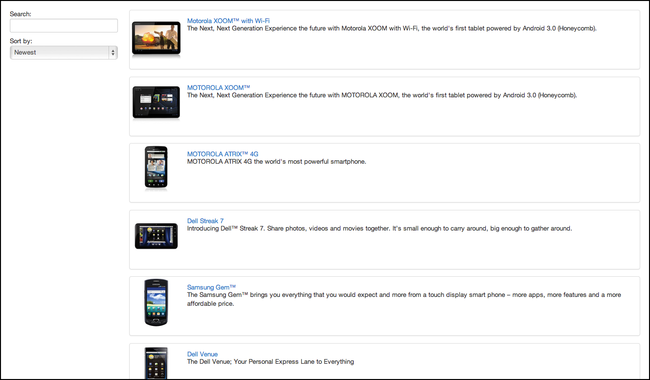](https://svbtleusercontent.com/y5ml9givwlpq8g.png).
# Step-7 Routing the Phone Show View
Reset the work-space to the next step by running
```
git checkout -f step-7
```
The full diff can be found on [github](https://github.com/204NoContent/backbone-phonecat/commit/7742e711fdef7a9ced88e8270b9ac417626bacdc).
We would like to make our phone links work so that clicking a phone on the index page will take you the the correct phone show page. The first step is to create the matching route.
**public/javascripts/router.js**
```javascript
Router = Backbone.Router.extend({
routes: {
'': 'phonesIndex',
'phones/:id': 'phonesShow'
},
phonesIndex: function () {
new PhonesIndexView({ el: 'section#main' });
},
phonesShow: function (id) {
new PhonesShowView({
el: 'section#main',
model: new Phone({ id: id })
});
}
});
```
Now, whenever the Backbone router detects that the URL has been changed to match `phones/` followed by a specific phone `id`, it will call the `phonesShow` method and pass in whatever phone `id` happens to match. The `phoneShow` method creates a new `PhonesShowView`, tells it where it is allowed to render its content, and also creates a new phone model. Specifically, the phone model it creates has one attribute assigned to it, its `id`. Setting this `id` is important since it allows Backbone to know where to request information about the phone from the server. To make this magic happen we need to specify the beginning part of the URL that our API responds to.
**public/javascripts/models/phone.js**
```javascript
Phone = Backbone.Model.extend({
urlRoot: '/api/phones'
});
```
With the url route specified in the model constructor, calling `fetch` on any model instance with an `id` will automatically send a `GET` request to the url `/api/phones/id`, where `id` is the `id` that we set in the router.
To get the model data fetching process started, we need to set it up in our phones show view.
**public/javascripts/views/phones/show_view.js**
```javascript
PhonesShowView = Backbone.View.extend({
initialize: function () {
this.model.fetch();
this.listenTo(this.model, 'sync', this.render);
},
render: function () {
this.$el.html(JST['phones/show'](this.model));
}
});
```
The first thing we do is tell the model to go fetch its data from the API. Next, we attach a listener to that will call the render method whenever the model data is returned from the server.
As an aside, I guess technically we should attach the listener before calling `fetch` on the model, but since `fetch` is done asynchronously, the ordering doesn't matter since the line that defines the listener will be evaluated before any callback can be fired. End aside.
Once the model is fetched from the server, Backbone automatically parses the response so that the model data can be accessed using the model `get` method. Just to make sure everything is working correctly, let's create a super simple template that will display the clicked on phone's id on the screen.
**public/javascripts/templates/phones/show.jst**
```javascript
TBD: detail view for [[= get('id') ]]
```
Now going to the phones index page at [localhost:8888](http://localhost8888) and clicking on the first phone, for example, will display its id.
[](https://svbtleusercontent.com/bb1fn4f5vexh4q.png)
# Step-8 Phone Show View
Reset the work-space to the next step by running
```
git checkout -f step-8
```
The full diff can be found on [github](https://github.com/204NoContent/backbone-phonecat/commit/6337327833a3bb715b468230a5037dfd170a32b2).
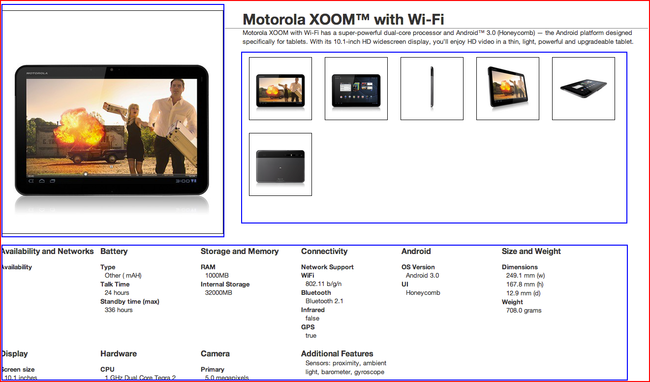
In this step, our aim is to have the phone show view display all the phone details on the screen. This step has a lot of stuff going on so it is helpful to first examine what we are trying to make
[](https://svbtleusercontent.com/m5gg13mslwfvg.png)
There are different ways to break apart and render complicated views like this one, but the approach we are going to use here is to break it down into one parent view and three child views.
[](https://svbtleusercontent.com/n1d8qp773qxgwg.png)
The first thing we'll do is to adjust our main show template to display the name and description that appear in the upper right of the main view and to create HTML elements for the child views.
**public/javascripts/templates/phones/show.jst**
```javascript
<div class='phone-images'></div>
<h1>[[= get('name') ]]</h1>
<p>[[= get('description') ]]</p>
<ul class='phone-thumbs'></ul>
<ul class='specs'></ul>
```
Next, we'll create new child views and assign them their elements.
**public/javascripts/views/phones/show_view.js**
```javascript
PhonesShowView = Backbone.View.extend({
initialize: function () {
this.model.fetch();
this.listenTo(this.model, 'sync', this.render);
},
render: function () {
this.$el.html(JST['phones/show'](this.model));
new PhonesShowImageView({
el: this.$('.phone-images'),
model: this.model
});
new PhonesShowImagesListView({
el: this.$('ul.phone-thumbs'),
model: this.model
});
new PhonesShowSpecsView({
el: this.$('ul.specs'),
model: this.model
});
}
});
```
Working down the list, the PhonesShowImageView just initializes and renders
**public/javascripts/views/phones/show_image_view.js**
```javascript
PhonesShowImageView = Backbone.View.extend({
initialize: function () {
this.render();
},
render: function () {
this.$el.html(JST['phones/show_image'](this.model.get('mainImage')));
}
});
```
The more interesting question is what is it rendering. The data included with Angular treats images as nothing more than a path to their location on the server. While this is a fine approach, we're going to promote images from simple strings to full blown Backbone models.
**public/javascripts/models/photo.js**
```javascript
Photo = Backbone.Model;
```
Inspecting further the data that Angular has given us, we notice that one of the `Phone`'s attributes is a list of images stored in an array. Since we are going to promote photos to Backbone models, a list of photos calls out to be converted to a Backbone collection. Let's define that collection.
**public/javascripts/collections/photos_collection.js**
```javascript
PhotosCollection = Backbone.Collection.extend({
model: Photo
});
```
Since our data modeling is now in good shape, we turn to converting the image URLs to `Photo` models and converting the images array to a `PhotosCollection`. The place to do these conversions is wherever the data is being returned to us from the server, which in this case is in the `Phone` model. Backbone provides to a hook to access the server response as a special model method called `parse`.
**public/javascripts/models/phone.js**
```javascript
Phone = Backbone.Model.extend({
urlRoot: '/api/phones',
parse: function (res) {
if (res.images) {
this.photosCollection = new PhotosCollection(_.map(res.images, function (image_path) { return { path: image_path }; }));
this.set('mainImage', this.photosCollection.models[0]);
}
return res;
}
});
```
We directly assign a photos collection to the phone model and convert each of the image strings to `Photo` models with one attribute called `path`. We also default the `Photo` model attribute `mainImage` to be the first `Photo` model in the collection. We set it using the `set` writer method so that changes will be automatically picked up by Backbone and the appropriate events will fire.
Finally, getting back to the template of our `PhonesShowImageView`
**public/javascripts/templates/phones/show_image.jst**
```html
<img src="[[= '/' + get('path') ]]" class='phone'>
```
The next view in our list is the `PhonesShowImagesListView`. The idea for this view is to render out a thumbnail for each phone photo. Since we have access to the photo collection through our phone model it's easy to do using the same technique as we illustrated earlier.
**public/javascripts/views/phones/show_images_list_view.js**
```javacript
PhonesShowImagesListView = Backbone.View.extend({
initialize: function () {
this.render();
},
render: function () {
this.$el.html('');
this.model.photosCollection.each(this.renderImage, this);
},
renderImage: function (photo) {
this.$el.append(new PhonesShowImagesListImageView({
tagName: 'li',
model: photo
}).el);
}
});
```
We first make sure the view's element is empty and then for each of the photos we create a separate photo model view and append the returned HTML to the list. The photo model view currently does nothing more than render the appropriate HTML for its photo model.
**public/javascripts/views/phones/show_image_view.js**
```javascript
PhonesShowImageView = Backbone.View.extend({
initialize: function () {
this.render();
},
render: function () {
this.$el.html(JST['phones/show_image'](this.model.get('mainImage')));
}
});
```
with corresponding template
**public/javascripts/templates/phones/show_images_list_image.jst**
```html
<img src="[[= '/' + get('path') ]]">
```
The final view in our list is the phone's specs. This view is really simple.
**public/javascripts/views/phones/show_specs_view.js**
```javascript
PhonesShowSpecsView = Backbone.View.extend({
initialize: function () {
this.render();
},
render: function () {
this.$el.html(JST['phones/show_specs'](this.model));
}
});
```
With a corresponding template that is basically just a dump of the phone's specs.
**public/javascripts/templates/phones/show_specs.jst**
```html
<li>
<span>Availability and Networks</span>
<dl>
<dt>Availability</dt>
<dd>[[= get('availability') ]]</dd>
</dl>
</li>
<li>
<span>Battery</span>
<dl>
<dt>Type</dt>
<dd>[[= get('battery').type ]]</dd>
<dt>Talk Time</dt>
<dd>[[= get('battery').talkTime ]]</dd>
<dt>Standby time (max)</dt>
<dd>[[= get('battery').standbyTime ]]</dd>
</dl>
</li>
.
.
.
```
In fact, this view is too simple. It doesn't have a real purpose and probably should just be part of the parent view. The reason we broke it off here was in anticipation of having some nicely formatted details data. We were then going to just loop over the data and programmatically generate all the details, possibly with the use of some string inflector methods. However, the data we're using from Angular doesn't lend itself well to that purpose, which is understandable.
Currently our main image view, and image list view suffer from a similar problem of irrelevancy, but we will see the utility of breaking them off in the last section of this tutorial.
First let's put a little polish on the way our specs look.
# Step-9 Phone Show Helper
Reset the work-space to the next step by running
```
git checkout -f step-9
```
The full diff can be found on [github](https://github.com/204NoContent/backbone-phonecat/commit/29943da94ce87dd2f24c1fcb761bd15a36f986b6).
The problem that we are trying to solve is that some of our specs return a Boolean so the words `true` and `false` are being printed on the screen. We speculate that users would rather see a ✓ to represent `true` and an ✘ to represent `false` rather then the words themselves. Making this happen is pretty easy. We first define a global phones helper object and give it a checkmark method.
**public/javascripts/helpers/phones_helper.js**
```javascript
PhonesHelper = {
checkmark: function (truthy) { return truthy ? '\u2713' : '\u2718'; }
};
```
We used a global object to store phone helper methods, but we could have encapsulated the helper if we wanted to in order to to lessen the possibility of name collisions.
The only other thing to do is to use our new helper in the phone specs template.
**public/javascripts/templates/phones/show_specs.jst**
```html
.
.
.
<li>
<span>Connectivity</span>
<dl>
.
.
.
<dt>Infrared</dt>
<dd>[[= PhonesHelper.checkmark(get('connectivity').infrared) ]]</dd>
<dt>GPS</dt>
<dd>[[= PhonesHelper.checkmark(get('connectivity').gps) ]]</dd>
</dl>
</li>
<li>
<span>Display</span>
<dl>
.
.
.
<dt>Touch screen</dt>
<dd>[[= PhonesHelper.checkmark(get('display').touchScreen) ]]</dd>
</dl>
</li>
<li>
<span>Hardware</span>
<dl>
.
.
.
<dt>FM Radio</dt>
<dd>[[= PhonesHelper.checkmark(get('hardware').fmRadio) ]]</dd>
<dt>Accelerometer</dt>
<dd>[[= PhonesHelper.checkmark(get('hardware').accelerometer) ]]</dd>
</dl>
</li>
.
.
.
```
And voilà, ✓'s and ✘'s on our page at [localhost:8888/phones/motorola-xoom-with-wi-fi](http://localhost:8888/phones/motorola-xoom-with-wi-fi)
[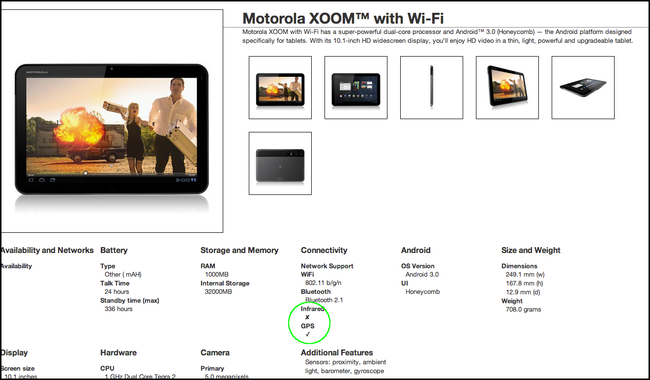](https://svbtleusercontent.com/aleryzvdgcha.png)
# Step-10 Main Image Swapping
Reset the work-space to the next step by running
```
git checkout -f step-10
```
The full diff can be found on [github](https://github.com/204NoContent/backbone-phonecat/commit/98d25f04bf9adbb31f0be59bf421c09aa2da6c73).
The last order of business is to let the user change out the main image for any thumbnail. We'll let them swap out the image by clicking on whichever thumbnail image they want to see.
We're already in good shape since we broke apart our views in step-8 and made our photos full blown Backbone models. The first thing we need to do is trigger an event to let the `Phone` know which photo it is suppose to replace it's `mainImage` with. The natural place to do this is in the photo model view.
**public/javascripts/views/phones/show_images_list_image_view.js**
```javascript
PhonesShowImagesListImageView = Backbone.View.extend({
events: {
'click': 'selectImage'
},
.
.
.
selectImage: function (event) {
this.model.trigger('imageSelected', this.model);
}
});
```
This works by triggering a custom event `'imageSelected'` on whichever `Photo` model was clicked, since we linked the click event to `selectImage`. We also make sure to pass the entire photo model along as data with the `'imageSelected'` event. In Backbone, all model events are automatically trigger on their collection as well, so we can listen to the collection instead of trying to listen to every photo model. We'll do this in the main image view.
**public/javascripts/views/phones/show_image_view.js**
```javascript
PhonesShowImageView = Backbone.View.extend({
initialize: function () {
this.listenTo(this.model.photosCollection, 'imageSelected', this.setMainImage);
this.listenTo(this.model, 'change:mainImage', this.render);
this.render();
},
.
.
.
setMainImage: function (photo) {
this.model.set('mainImage', photo);
}
});
```
Here, we listen for a `PhotosCollection` `'imageSelected'` event and set the main image of the `Phone` model to be whichever photo model was clicked. Next, the main image is re-rendered since we have a listener monitoring changes to the phone's main image that calls the view's render method.
With those additions, clicking a thumbnail photo at [localhot:8888/phones/motorola-xoom-with-wi-fi](http://localhost:8888/phones/motorola-xoom-with-wi-fi) will now replace the main image.
[](https://svbtleusercontent.com/z50l2zrtpbfwq.png)
# Wrapping-up
We've reach the end of our tutorial. The Angular tutorial contains two more steps -- integration with a REST API in step-11 and animations in step-12. We've already covered integration with a REST API in step-5 of this tutorial by fetching data through Backbone models and collections. Angular's animations seem like a great feature, and something that might be fun to do with Backbone, but animations fall outside Backbone's core area of applicability.
All in all, coding the PhoneCat tutorial in Backbone took 171 lines of JavaScript, whereas the original PhoneCat app coded in Angular only took 48 lines. The extra lines of code in Backbone mostly came from creating a bunch of Backbone views. Backbone requires these extra views because having a [well defined view structure](http://204nocontent.me/how-to-structure-and-render-views-in-backbone) greatly facilitates data binding. Angular takes care of most of this behind the scenes with Angular scopes.
I hope you find this tutorial helpful when trying to decide between Angular and Backbone for your next app. Angular seems like a great JavaScript framework and I'm impressed by the brevity of the code. For my next app I'm going to consider using Angular, but I'm really fond of the less restrictive nature of Backbone, so I'll probably end up sticking with Backbone.