How to Structure and Render Views in Backbone
tl;dr
Limited coupling between parent and child views is accomplished by making child views responsible for rendering their own content. Parent views communicate with child views by triggering collection events. Memory leaks are avoided by listening to router events and removing view listeners when appropriate.
The beauty of Backbone is that it gives you lots of freedom. I really appreciate the fact that Backbone strives to find the minimal set of useful primitives instead of deciding everything for you. This is why I was drawn to Backbone in the first place. Backbone solved problems that I actually had without forcing me down a path I didn’t understand. Most of the time Backbone’s lack of rigidity is a breath of fresh air. The downside, of course, is that you have to spend time figuring out how to do things on your own. And since coding client-side JavaScript apps isn’t always the most straightforward thing to do, sometimes a little guidance can be helpful. One area that has tripped me up a bit was how to best structure my views. The aim of this article is to try to clear the air a bit by sharing what has worked well for me.
The primary thing I keep in mind when structuring of a new set of Backbone views is that when a parent view creates a child view, it should give that child view full control over a specified DOM element. The child view is then responsible for rendering its content appropriately in the element provided by the parent, and the parent view should not have to tell their child view what to do. Child self-sufficiency is a common design pattern in Backbone and I encourage you to check out Kevin Peel’s brilliant Stack Overflow answer on the same subject.
The best way to explain child self-sufficiency is with some code. So let’s make things a little more concrete by coding a sample app in Backbone. A common set of requirements for a Backbone app is:
- Globally static content that is visible on all pages
- Two or more main section views
- Dynamic content generated from a collection of models
In our example app, the globally static content will be the header, our two main section views will be analogous to MVC architecture views users#index and cities#index, and our dynamic content will come from collections of Backbone models. We will create two collections that will hold users and cities. In the user index view we will render out the users collection and display a list of users and their locations. Analogously, the cities index view will show a list of cities and their populations.
Let’s start with the header, our globally static content. We want the html structure of the page to look like this:
<body>
    <header>
    </header>
    <section id='main'>
    </section>
</body>
To create this structure we will first have our web sever send back nothing more than an empty body tag. Then, Backbone will take over and fill in the header and section tags. In a production application, I might not use Backbone for globally static content like headers and footers since I could easily render them server-side, but for this sample application we’ll be strict about it and have Backbone do all the work client-side.
To create the header and section tags we are going to need an application view with a header subview, as well as each view’s corresponding template. First up, the application view and template:
views/application/main-view.js
ApplicationMainView = Backbone.View.extend({

    initialize: function () {
        this.render();

        new ApplicationHeaderView({ el: 'header' });
    },

    render: function () {
        this.$el.html(JST['application/main']());
    }
});
Before anything else happens, the application view renders it’s own static content since Backbone automatically calls the initialize method when a view is instantiated. The content itself is stored in a JavaScript template file:
templates/application/main.jst
<header>
</header>
<section id='main'>
</section>
If you are wondering what JST is, wonder no more. JST is a global JavaScript object that serves as a dictionary of template functions. These template function are created on the server by passing the code of any .jst file through the underscore templating engine _.template(my_template.jst), or equivalent. It is also possible to delay template generation to just before the client needs it, but in that scenario you’re requiring the client to do extra work when you could just compile all the templates in one go and ship them all in a global object like JST.
Quick aside, if you’re using a rails 3.1 or later, it has builtin support for sprockets middleware, which will automagically make a JST object for you using the templating language of your choice – ejs for JavaScript or eco for CoffeeScript. The only thing you need to do to make this magic happen is install the ejs or eco gem and name your template files with a .jst extension.
Back to the code. Next, the application view creates the header child view and tells it where it is allowed to render its content. In this case the application view tells the header view that it has full control over the contents of the header tag.
Let’s create the header view.
views/application/header-view.js
ApplicationHeaderView = Backbone.View.extend({

    initialize: function () {
        this.render();
    },

    render: function () {
        this.$el.html(JST['application/header']());
    }
});
This is a very simple view that renders it’s own template on initialization. We could have equivalently put the one line of the render function directly in the initialization, but I find that having a consistent render function is worth it from a maintainability point of view. If you haven’t seen view.$el before, $el is available to every Backbone view and is a cached jQuery object for $(view.el). In our case, this.$el is the jQuery object representing the header tag since, if you recall, we explicitly assigned the header view’s el to be the header tag in the parent view.
The corresponding template for the header view is
templates/application/header.jst
<a href='/users'>Users Index</a>
<a href='/cities'>Cities Index</a>
Here, we have created two links in anticipation of having a users index page and a cities index page.
The application and header views are now raring to go. We just need to kick things off with a router.
router.js
Router = Backbone.Router.extend({
    routes: {
        '': 'applicationMain',
    },

    applicationMain: function () {
        this.setup();
    },

    setup: function () {
        if (!this.applicationMainView) {
            this.applicationMainView = new ApplicationMainView({
                el: 'body'
            });
        }
    }
});
There is a little bit going on here so let’s break it down. The routes hash is built into the backbone router and maps URLs to router methods. In this case, we are indicating that when someone navigates their browser to the root path of our application, denoted by the empty string '', the router method applicationMain should be called. The router method applicationMain in turn calls the router setup method. The router setup method isn’t something built into Backbone. I just defined it here because I want to be able to execute some boilerplate code before proceeding to instantiate anything else. Right now, all the setup method does is create the application view if it doesn’t exist already. Note that we once again explicitly tell the application main view where it is allowed to put its content – the body tag.
The only thing left to do is to create a new instance of the router and tell Backbone to start monitoring page navigation. I like to do this in a file called init.js, which I load after all other JavaScript files.
init.js
App = new Router();

$(document).ready(function () {
    Backbone.history.start({ pushState: true });
});
If we navigate to the root path, we’ll see the header on the screen:

Since we are already properly displaying the global static content, the next thing to do is to start on a section view. The first section view we’re going to attack is users index. The users index view will ultimately render out a collection of user models with names and cities. I’ve supplied my application with some sample data attached to a data attribute of the body tag. In a real application of mine, I might preload data from the server in just this way – by attaching it to the body data tag, but the majority of the application data flow would go through a REST-like API. But, in this sample application, the hard coded user index data is all we’ll need. The first thing to do is to create the users index view.
views/users/index-view.js
UsersIndexView = Backbone.View.extend({
    initialize: function () {
        this.render();

        this.usersData = $('body').data('users');
        this.collection = new UsersCollection(this.usersData);

        new UsersIndexListView({
            el: this.$('ul'),
            collection: this.collection
        });
    },

    render: function () {
        this.$el.html(JST['users/index']());
    }
});
The corresponding template for this view gives the list a title and also provides an empty list tag as place for the child index list view to put its content.
templates/users/index.jst
<h1>
    All Users
</h1>
<ul>
</ul>
The first thing that happens is the view renders its own template. Then we read in the user data from the body tag and create a new users collection. I like to create collections as soon as I feel like they could be useful. Then I pass the collection down the chain to every child view. The rationale for this is that the collection is a great place to trigger events between views. Every Backbone collection comes with a very nice event bus that emits a standard set of collection and model events. Triggering a custom event is no problem either, you just do myCollection.trigger('myCustomEvent'). You can even pass along data through optional arguments. Backbone’s event bus is pretty sweet.
The next thing that happens in the users index view is to create a new users list view and tell it where it is allowed to put its content – the list tag that we just made. Along with passing an element to the child view, we also pass along our users collection.
I really appreciate the backbone helper method this.$. This helper method limits the scope of the jQuery selector to only those DOM nodes that are children of our view’s el.
Next up, the users index list view:
views/users/index-list-view.js
UsersIndexListView = Backbone.View.extend({

    initialize: function () {
        this.render();
    },

    render: function () {
        this.$el.html('');
        this.collection.each(this.renderUser, this);
    },

    renderUser: function (user) {
        this.$el.append(new UsersIndexListUserView({
            tagName: 'li',
            model: user
        }).el);
    }
});
There’s no template for this view since every item in the list will be generated dynamically. The view renders when is is initialized to kick off the list generation. The render method first wipes the html of the list in order to ensure that we clear out any old list elements that happen to be leftover. After that, we loop over every user model in the users collection and pass it to the renderUser method. The renderUser method creates a new view for each user model and appends it to the list. We tell Backbone to generate the list element tag for us by using the tagName option when creating each user model view.
Last, we need to create the user model view and template
views/users/index-list-user-view.js
UsersIndexListUserView = Backbone.View.extend({

    initialize: function () {
        this.render();
    },

    render: function () {
        this.$el.html(JST['users/index-list-user'](this.model));
    }
});
with corresponding template
templates/users/index-list-user.jst
<div>name: [[= get('name') ]]</div>
<div>city: [[= get('city') ]]</div>
Here we are using my preferred notation for embedded JavaScript [[ instead of the default EJS <%. I prefer this notation because when I’m doing node, I reserve the default EJS syntax <% for embedded JavaScript that will be inserted on the server and use [[ for embedded JavaScript that will be evaluated on the client. If instead, I am working in rails, I’ve found that not using <% notation for embedded JavaScript makes it easier for me to glance at a file and know if I’m messing around with embedded JavaScript or embedded ruby since erb uses the same notation. Your mileage may vary but we’ll be using [[ notation here.
In the initialize method, all we currently do is render the model. The render method invokes the template and passes the model as data. In the template, we render out the user’s name and city.
To get the users list to appear on the screen, all that is left to do is to add a route to our router:
router.js
Router = Backbone.Router.extend({

    routes: {
        '': 'applicationMain',
        'users': 'usersIndex'  // matches 'exapmle.com/users'
    },

    applicationMain: function () {
        this.setup();
    },

    setup: function () {
        if (!this.applicationMainView) {
            this.applicationMainView = new ApplicationMainView({
                el: 'body'
            });
        }
    },

    // make sure the application view has rendered
    // give users index control of the main section
    usersIndex: function () {
        this.setup();
        new UsersIndexView({ el: 'section#main' });
    }

});
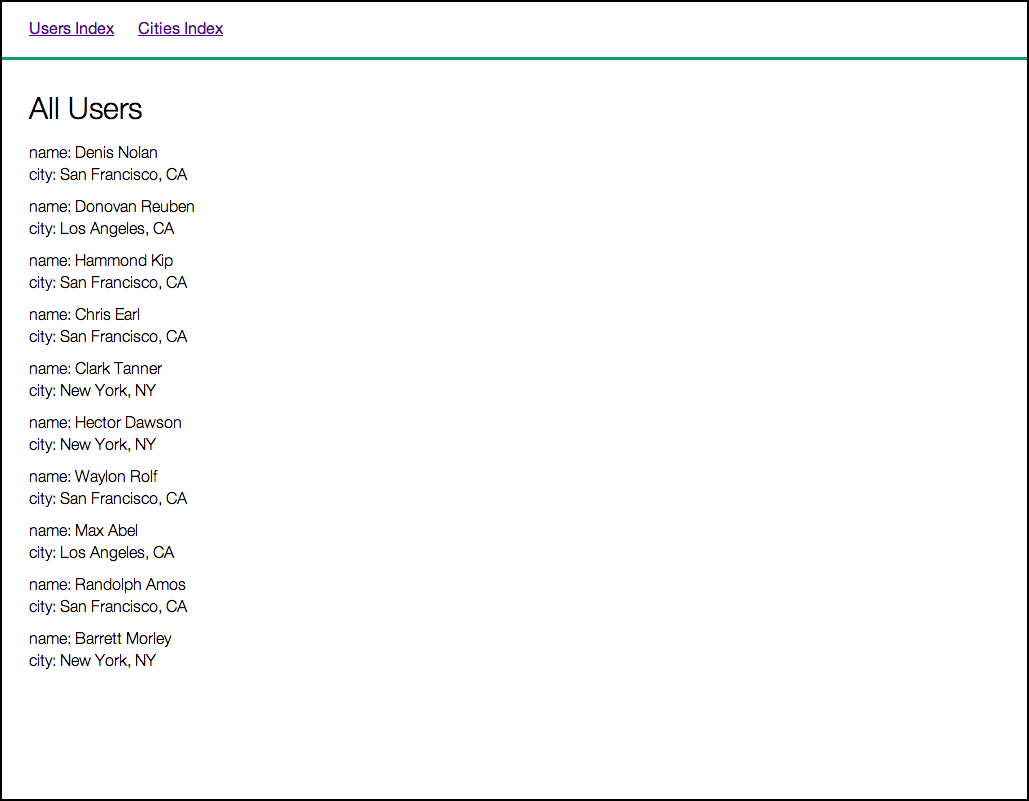
Now, when I navigate my browser over to /users, I see a list of users with names and cities:
The reason this works at all is due to the fact that behind the scenes I have my web server configured to always render the same html content – an empty body tag. That way, the server always returns the necessary body tag for both the root path, the users index path /users, and the cities index path /cities. However, unlike the server, Backbone does care about the path and uses it to determine what router method should be called.
At this point in a real application I would start adding events to my model views so they do something cool when the user clicks them. I would also sprinkle some model and collection listeners around the code to re-render things when the model or collection changes. We’ll get to adding those things in a bit, but first let’s set up the views for our cities index page much like we did for users.
views/cities/index-view.js
CitiesIndexView = Backbone.View.extend({

    initialize: function () {
        this.render();

        this.citiesData = $('body').data('cities');
        this.collection = new CitiesCollection(this.citiesData);

        new CitiesIndexListView({
            el: this.$('ul'),
            collection: this.collection
        });
    },

    render: function () {
        this.$el.html(JST['cities/index']());
    }
});
with template
templates/citeis/index.jst
<h1>
    All Cities
</h1>
<ul>
</ul>
Next, the city list view:
views/cities/index-list-view.js
CitiesIndexListView = Backbone.View.extend({

    initialize: function () {
        this.render();
    },

    render: function () {
        this.$el.html('');
        this.collection.each(this.renderCity, this);
    },

    renderCity: function (city) {
        this.$el.append(new CitiesIndexListCityView({
            tagName: 'li',
            model: city
        }).el);
    }
});
Like the users list view, this view has no corresponding template. Last, the city model view:
views/cities/index-list-city-view.js
CitiesIndexListCityView = Backbone.View.extend({

    initialize: function () {
        this.render();
    },

    render: function () {
        this.$el.html(JST['cities/index-list-city'](this.model));
    }
});
with correspoinding template:
templates/cities/index-list-city.jst
<div>name: [[= get('name') ]]</div>
<div>population: [[= get('population') ]]</div>
All of these views and templates are almost exact duplicates of the users views and templats so there should be no surprises. All that is left to do is create the new route.
router.js
Router = Backbone.Router.extend({

    routes: {
        '': 'applicationMain',
        'users': 'usersIndex',
        'cities': 'citiesIndex' //  matches 'exapmle.com/cities'
    },

    applicationMain: function () {
        this.setup();
    },

    setup: function () {
        if (!this.applicationMainView) {
            this.applicationMainView = new ApplicationMainView({
                el: 'body'
            });
        }
    },

    usersIndex: function () {
        this.setup();
        new UsersIndexView({ el: 'section#main' });
    },

    // setup application view if necessary
    // and give cities index view control of the main section
    citiesIndex: function () {
        this.setup();
        new CitiesIndexView({ el: 'section#main' });
    }
});
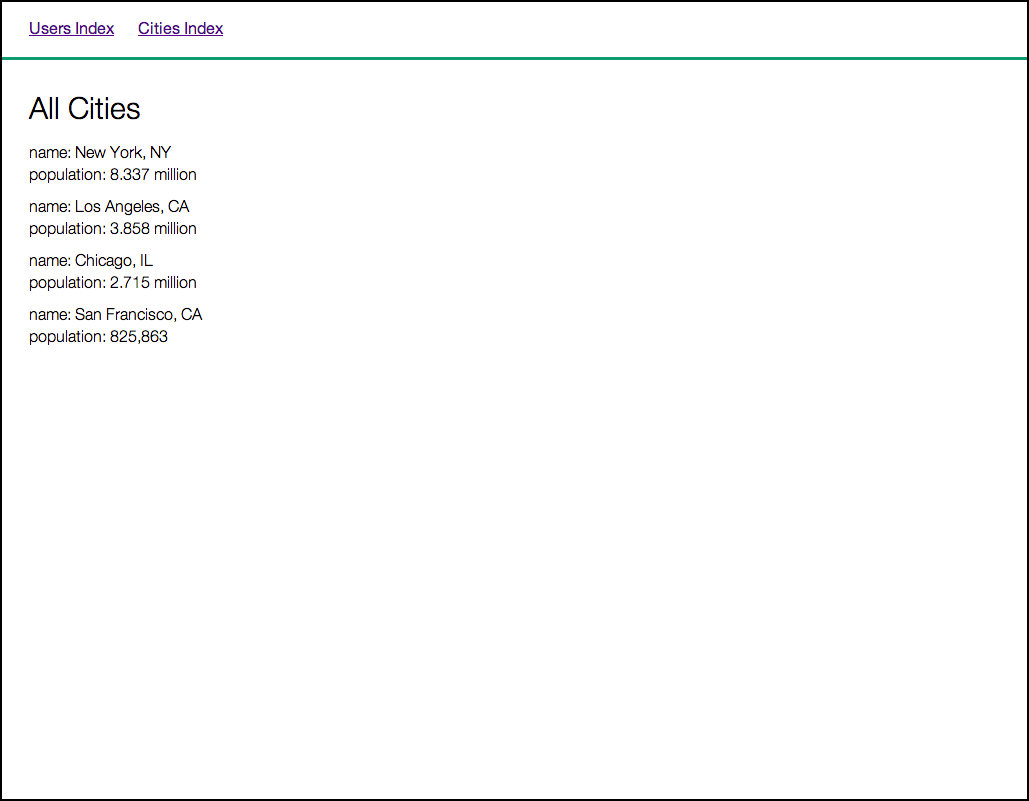
Navigating the browser over to /cities displays a list of cities:
Clicking the links at the top of the page will toggle between the two views. There is, however, one issue with the way the links currently work. Right now, when you click one of the links, the browser does a full page refresh. This means that every time a link is clicked, the browser sends a request to the web server. The server then returns a body tag after which Backbone determines which router method to call by checking the URL. This behavior is really wasteful because after the first page load, the sever just keeps returning the same empty body tag. To fix this issue, we’re going to prevent the default link behavior and use Backbone to update the browser’s history for us. To do this, we need to add a click handler to the links in the application header view.
views/application/header-view.js
ApplicationHeaderView = Backbone.View.extend({

    // handle all header link clicks
    events: {
        'click a': 'navigate'
    },

    initialize: function () {
        this.render();
    },

    render: function () {
        this.$el.html(JST['application/header']());
    },

    // tell the router instance 'App' to update browser history
    // and trigger the matching route
    navigate: function (event) {
        event.preventDefault();
        App.navigate(event.target.pathname, { trigger: true });
    }
});
Much better. Now, when one of the links is clicked we use Backbone’s router navigation method to update the browser’s history. Since we are also passing { trigger: true }, Backbone knows to call the matching route (recall that we named our instance of the Backbone router App when we created it).
By the way, the events hash is available in every Backbone view and provides a mapping between jQuery events and view methods. As a tip, if you find yourself handling jQuery events manually, like $('.foo').on('click', function () { ... }), it almost always means that you should create a child view for that element and use Backbone’s events hash instead.
Everything is now working as expected. The header is always on the screen and never gets re-rendered. There are two section views that place their dynamic content in the section tag, which was originally created by the application main view. Changing views happens quickly and without making unnecessary calls to the web server.
However, making single page apps comes at a price – you have to worry about memory leaks. So, have we created a memory leak thus far? Let’s check. Here is a screenshot of Chrome’s memory timeline:

The plot was generated by clicking back and forth between the users and cities index actions. After toggling between the two views about 20 times the garbage collector was run manually. The entire process was repeated a total of three times.
We can see from the timeline that we do not have a memory leak. The memory consumption, shown in light blue in the top plot, goes up and down, but does not have a upward trend. The same thing can be said about the number of DOM nodes, the green line in the bottom chart. They start at 178 and rise until the garbage collector is run. But after the garbage collector runs, the DOM node count returns to 178. Event listeners are constant throughout the experiment.
Lets add an event to a dynamic view and see if our app remains free of memory leaks. I think it would be nice to have each user say ‘hi’ in the console when you click on them, so let’s add that functionality:
view/users/index-list-user-view.js
UsersIndexListUserView = Backbone.View.extend({

    // listen for clicks on a user list element
    events: {
        'click': 'log'
    },

    initialize: function () {
        this.render();
    },

    render: function () {
        this.$el.html(JST['users/index-list-user'](this.model));
    },

    // make the clicked user say 'hi' in the console
    log: function () {
        console.log(this.model.get('name') + ' says hi');
    }
});
When we rerun our memory timeline experiment we get:

The memory looks good. This time the number of event handlers changes when we toggle between users and cities since we attached listeners to the users but not to the cities. However, the total number of event listeners does not trend upward. The important thing to note is that the number of event handlers begins and ends at 21, and the DOM nodes count starts and ends at 178.
So handling events on the view elements did not cause a memory leak, but what happens if we attach a listener to the model itself? To explore this idea, we are going to make each user’s name “censorable”.
view/users/index-list-user-view.js
UsersIndexListUserView = Backbone.View.extend({

    // call the censor method when a user is clicked
    events: {
        'click': 'censor'
    },

    initialize: function () {
        this.render();

        // listen to changes to the model
        this.listenTo(this.model, 'change', this.render);
    },

    render: function () {
        this.$el.html(JST['users/index-list-user'](this.model));
    },

    // replace the user's name with x's
    censor: function () {
        this.model.set({
            name: this.model.get('name').replace(/./g, 'x')
        });
    }
});
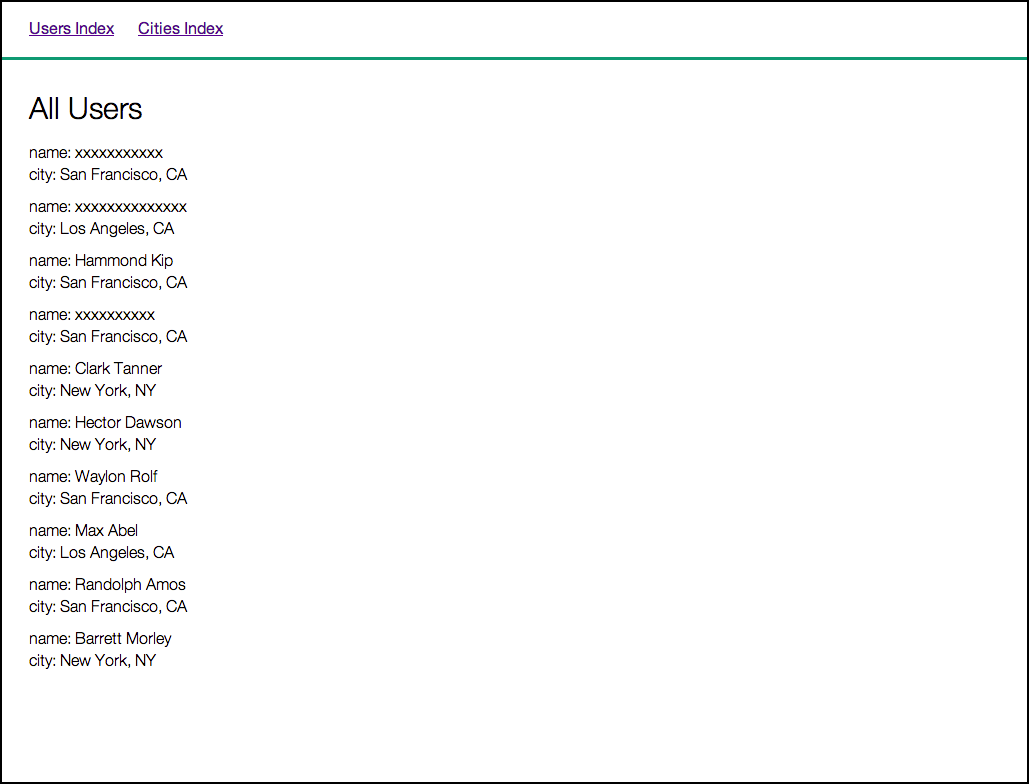
Now, whenever you click on a user, the censor method is called and every character of the user’s name is replaced by an x. Also, the view is now listening to model changes, so when the model’s name changes to x’s, the view will call the render method and the page will be updated.
Censored names look like this:
The results of the memory test are still good:

So how do we make a memory leak anyway? Well, memory leaks are made by inadvertently keeping a reference between something that still exists and something that shouldn’t exist anymore, or a reference cycle as the case may be. Let’s make something that will always stick around so we can see a memory leak.
To do this, we will create a global variable to represent the user’s preferences. This global variable will be a instance of a Backbone model called Preferences.
models/preferences.js
Preferences = new (Backbone.Model.extend({
    defaults: {
        censorable: true
    }
}))();
The important point here is that we immediately create a new instance of the Backbone model, so Preferences is the name of a global variable and not a constructor like a normal Backbone model. Next, we need to reference it in one of our views.
view/users/index-list-user-view.js
UsersIndexListUserView = Backbone.View.extend({

    events: {
        'click': 'censor'
    },

    initialize: function () {
        this.render();

        this.listenTo(this.model, 'change', this.render);
    },

    render: function () {
        this.$el.html(JST['users/index-list-user'](this.model));
    },

    censor: function () {
        // only censor name if censoring is allowed by 'Preferences'
        if (Preferences.get('censorable')) {
            this.model.set({
                name: this.model.get('name').replace(/./g, 'x')
            });
        }
    }
});
However, simply referencing a global variable in one of our views isn’t going to cause a memory leak:

If we want a memory leak, we need to listen to it.
view/users/index-list-user-view.js
UsersIndexListUserView = Backbone.View.extend({

    events: {
        'click': 'censor'
    },

    initialize: function () {
        this.render();

        this.listenTo(this.model, 'change', this.render);
        // listen for a global 'Preferences' change
        this.listenTo(Preferences, 'change:censorable', this.log);
    },

    render: function () {
        this.$el.html(JST['users/index-list-user'](this.model));
    },

    censor: function () {
        if (Preferences.get('censorable')) {
            this.model.set({
                name: this.model.get('name').replace(/./g, 'x')
            });
        }
    },

    // output whether the model's name can be censored
    log: function () {
        var id = this.model.get('id');
        if (Preferences.get('censorable')) {
            console.log('user ' + id + ' is censorable');
        } else {
            console.log('user ' + id + ' is not censorable');
        }
    }
});
The idea here is that when the preferences global is updated, each model will log if it is censorable. I admit that this functionality is a little contrived, but it does the trick of creating a memory leak. If I click to the cities page, then back to the users page, then set the censorable preference to false, Preferences.set('censorable', false), I see all of the models logged twice. This is due to the fact that the users index list view was created twice and the first set of model views couldn’t be garbage collected since they still were listening to the global Preferences object.
The memory timeline with this leak looks like this:

It can be seen from the top plot that the memory has gone up steadily. Also, the bottom plot show an increasing number of DOM nodes.
So what’s the solution for this memory leak? Well, you could keep track of all of the model views and remove they manually, but my advice here is to not code something like this in the first place. A model view listening to a global variable like this seems weird to me, but I do often do listen to global variables at the collection level. Let’s examine a similar memory leak there, and fix that one instead.
Before we begin, I’m going to revert our model view to get rid of the memory leak we introduced. For reference here is what the file looks like now:
view/users/index-list-user-view.js
UsersIndexListUserView = Backbone.View.extend({

    events: {
        'click': 'censor'
    },

    initialize: function () {
        this.render();

        this.listenTo(this.model, 'change', this.render);
    },

    render: function () {
        this.$el.html(JST['users/index-list-user'](this.model));
    },

    censor: function () {
        if (Preferences.get('censorable')) {
            this.model.set({
                name: this.model.get('name').replace(/./g, 'x')
            });
        }
    }
});
Our user model view no longer has a memory leak so let’s introduce one at the collection level.
views/users/index-view.js
UsersIndexView = Backbone.View.extend({

    initialize: function () {
        this.render();

        this.usersData = $('body').data('users');
        this.collection = new UsersCollection(this.usersData);

        new UsersIndexListView({
            el: this.$('ul'),
            collection: this.collection
        });

        // listen for changes to 'Preferences'
        this.listenTo(Preferences, 'change:censorable', this.resetCollection);
    },

    render: function () {
        this.$el.html(JST['users/index']());
    },

    // reset user collection to make sure all user names can be seen
    resetCollection: function () {
        if (!Preferences.get('censorable')) {
            console.log('resetting the users collection');
            this.collection.reset(this.usersData);
        }
    }
});
The idea here is that if the global Preferences are set to prohibit censorship, then the users collection should be re-render. This way we can ensure all names will appear on the screen.
As it stands, the users collection will be reset, but the collection will not be re-rendered. To make that happen we need to add a collection listener to the users index list view
views/users/index-list-view.js
UsersIndexListView = Backbone.View.extend({

    initialize: function () {
        this.render();

        // render when collection is reset
        this.listenTo(this.collection, 'reset', this.render);
    },

    render: function () {
        this.$el.html('');
        this.collection.each(this.renderUser, this);
    },

    renderUser: function (user) {
        this.$el.append(new UsersIndexListUserView({
            tagName: 'li',
            model: user
        }).el);
    }
});
Alright, the functionality is all there. Let’s just quickly verify that we’ve successfully introduced a memory leak:

We do indeed have a memory leak. Also, since I clicked back a forth a bunch of times, when I finally did change the global Preferences, the message “resetting the users collection” was logged many times at once.
Clearly we have a broken application, but this time is makes a lot of sense to reset the users collection when a global preference is changed. Let’s go about fixing the memory leak. The heart of the problem is that the users index view is still listening to the global Preferences object even when the index view is no longer on the screen. To fix this, we need to somehow tell the users index view to stop listening to any events when it is going to be removed from the screen. Backbone provides the stopListening view method for just this reason.
The users list view is removed from the screen when the router creates a new view and replaces the main section content. Let’s alter the router’s setup method to emit a stopListening event so that any prior section views can respond accordingly.
router.js
Router = Backbone.Router.extend({

    routes: {
        '': 'applicationMain',
        'users': 'usersIndex',
        'cities': 'citiesIndex'
    },

    applicationMain: function () {
        this.setup();
    },

    setup: function () {
        // emit stop listening event
        this.trigger('stopListening');
        if (!this.applicationMainView) {
            this.applicationMainView = new ApplicationMainView({
                el: 'body'
            });
        }
    },

    usersIndex: function () {
        this.setup();
        new UsersIndexView({ el: 'section#main' });
    },

    citiesIndex: function () {
        this.setup();
        new CitiesIndexView({ el: 'section#main' });
    }
});
Since the router is emitting the stopListening event, the uses index view just need to listen for that event.
views/users/index-view.js
UsersIndexView = Backbone.View.extend({

    initialize: function () {
        this.render();

        this.usersData = $('body').data('users');
        this.collection = new UsersCollection(this.usersData);

        new UsersIndexListView({
            el: this.$('ul'),
            collection: this.collection
        });

        this.listenTo(Preferences, 'change:censorable', this.resetCollection);
        // remove all listeners so view can be garbage collected
        this.listenTo(App, 'stopListening', this.stopListening);
    },

    render: function () {
        this.$el.html(JST['users/index']());
    },

    resetCollection: function () {
        if (!Preferences.get('censorable')) {
            this.collection.reset(this.usersData);
        }
    }
});
Running the memory test shows that all is well:

Instead of triggering an event, another approach would have been to call the users index view stopListening method directly from inside the router, but doing so would violate the principle of letting child views take care of themselves. In some of my earlier apps, I violated this principle in just this way, and problems arose. Usually, what would happen was that the unruly view would be somewhere in the middle of the view chain. It was really hard to single out just that one view and call stopListening on it. So instead, I would add a recursiveStopListing method to the Backbone view prototype like this:
Backbone.View.prototype.recursiveStopListening = function () {
    // propogate to all subviews
    _.each(this, function (prop) {
        if (prop instanceof Backbone.View) {
            prop.recursiveStopListening();
        }
    });

    // don't forget about yourself
    this.stopListening();
    return this;
}
Then any parent view would invoke recursiveStopListening on all of its descendants. There were two problems with this approach. The first problem is that recursiveStopListening needs to know what the child views are so you have to remember to create a reference to every new child view you create in the parent view object. Secondly, it is unclear what should be done when you have a situation like our first memory leak – when there’s a bunch of model views that all need to stop listening. One solution is to keep track of every one of those subviews in an array stored in the parent view and then call stopListening on every one of them. However, I find that solution to be inelegant. I greatly prefer the event based solution presented above over any recursive approach.
With our new found knowledge, if we really wanted to, we could easily fix a memory leak like the first one we introduced above. All we would have to do is add one line to the user model view this.listenTo(App, 'stopListening', this.stopListening);, and all would be well. Although this solution works well, I still don’t see the use case for listening to a global in a model view. Instead, I try to make my model views as independent as possible and find another way to pass a message if I really need something custom.
In summary, don’t tell your child views what to do or they’ll be prone to disobey you. Instead, structure your views to favor message passing through event bus. Allow your child views to listen to these events and handle themselves. Structuring my Backbone views like this has served me well in the past, and I encourage you give it a try.